
Timezero Navigator V4: Navigation software with C-Map charts and connected to Furuno Radar
For decades I have done well with raster charts from a German manufacturer on the laptop. What made me consider Timezero Navigator (tz) was the plan to do longer single-handed cruises. As an additional safety feature, I wanted to have a radar-based alerting function in the navigation software, so that I could be awakened to a dangerous approach if sleep should overtake me on the way ;-).
The products Timezero Navigator (tz) and Expedition were considered at the time. The decisive factor in favor of tz was the somewhat lower purchase price and the very simple connection to the Furuno Radar DRS4D-NXT.
Below I would like to give a short overview and experience report about the navigation software Timezero Navigator V4. The software can be installed and operated on Windows laptop or PC. I preferred this configuration because not only the functions of the software are more extensive than on a plotter but a computer can also be used for various other functions besides navigation. The system requirements specified by the manufacturer are absolutely within the limits:
- Microsoft® Windows® 7 SP1, or Windows® 8.1 or Windows® 10
- CPU 1.5 GHz, 4GB of RAM
- Video Board: Minimum – Intel HD Graphic Chipset
- Recommended – Dedicated Video Board with 1 GB VRAM or Intel HD 4th generation or above
- Screen Resolution: 1024 x 600 or higher (1280 x 800 or above recommended)
- Hard Disk: 30 GB of free space
- USB or Serial Port for connecting instruments via NMEA0183, Actisense USB NGT-1 for connecting instruments via NMEA2000 or 100 Base-T Network Adapter for Furuno Ethernet Sensors
First I ran the Timezero navigation software for 2 years on a simple laptop with 17″ display, then on a permanently installed on-board PC with 22″ monitor in a special marine version and graphics card. In the cockpit, an iPad connected via WLAN serves as an external display.
The data exchange with GPS, compass, autopilot, wind, log, sounding, AIS and radar is done via a NMEA Miniplexer, which exchanges all formats (NMEA 0183 and 2000 or Seatalk NG) bidirectionally via USB with the computer. The setup of the data interface for the navigation software is done quasi automatically with a wizzard and is easy to handle.
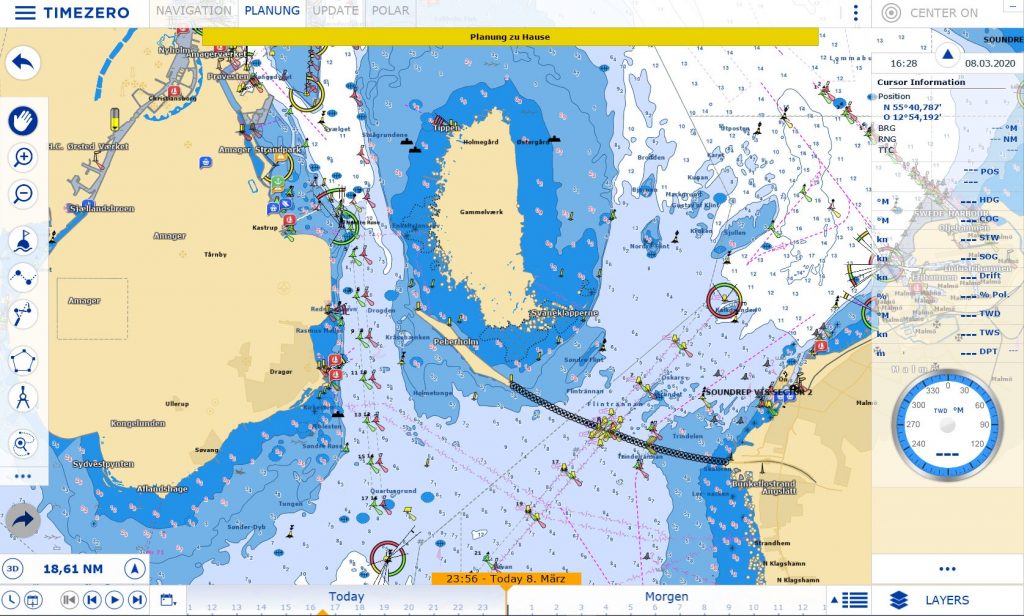
I decided to use C-Map Vector charts, which have a considerable gain in accuracy compared to raster charts in the detailed display, especially in archipelagic waters a real increase in safety. Precise GPS position data are of course a prerequisite.
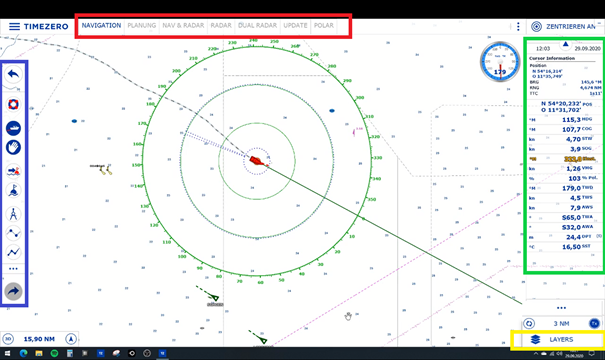
The user interface of the navigation software is ergonomic and largely intuitive. For better clarification, I have marked the areas listed below in the following figure with colored frames and in the following text in color. You can switch between the windows for different work environments or contexts (e.g. navigation, planning, radar, update, …) with a mouse click. A freely configurable data window shows the desired navigation data (e.g. SOG, COG, STW, HDG, DPT, A- or TWA, A- or TWS, VMG, but also ship and cursor position, cursor bearing and distance to ship position, etc …). A likewise configurable function bar allows the direct call of important functions (e.g. MOB, distance measurement, route planning, weather routing, … ) with one click. A smart layer concept allows to quickly switch on or off the desired map view (e.g. show or hide day, twilight and night view, weather and tide data, sea mark idents, light sectors and much more). By the way, easy access and participation in Garnim’s ActiveCaptain platform is also available and the “rated” locations are displayed on the map.
To go into all the interesting functions and setting options would go beyond the scope of this article. Therefore, I will limit myself in the following to the focal points of weather and weather routing as well as display and handling of radar with a Furuno DRS4D-NXT. After I needed several months and a commercial training for my research and selection decision a few years ago to gather this information relevant for me, I thought it might be helpful to compile exactly these aspects for other interested sailors at a glance.
Weather:
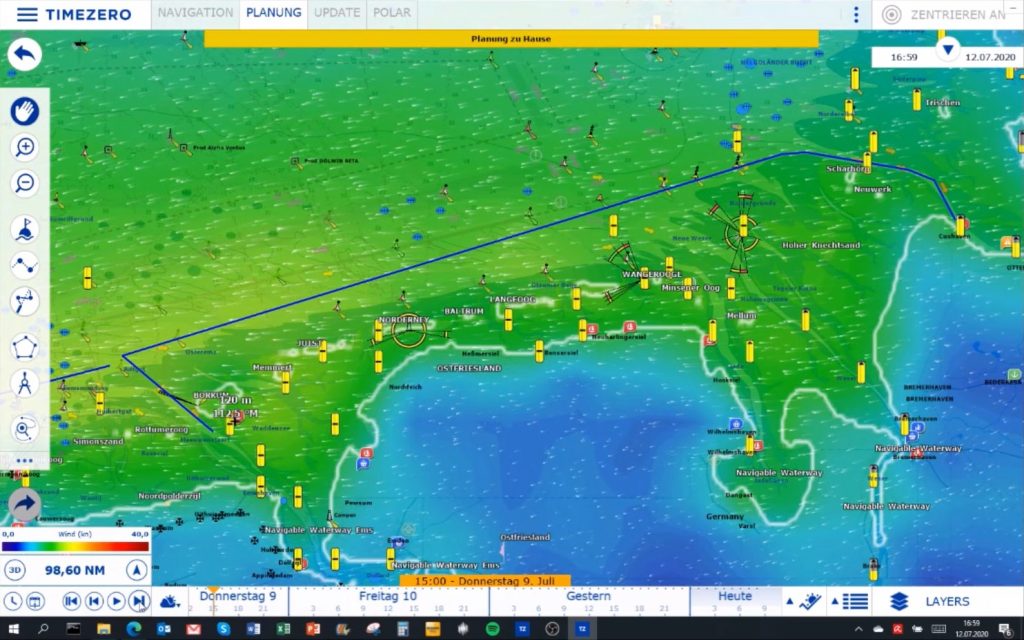
The program offers a very clear presentation of the weather forecast based on grib data from different sources and weather models (in the premium variant with access to GFS NOAA, Arpege, Arome Meteo France and DWD). The download of the weather data is comfortable and easy to handle, internet access provided of course. Wind direction is displayed either with arrows or as particle flow, and wind strength as feathers or two-dimensional coloring, as well as current, wave height, height of the tide at certain locations, and of course air pressure, also as isobars, as well as precipitation and cloud cover. The temporal and spatial resolution of the weather data depends on the selected weather model and data provider.
Either location-related or related to a planned route, a very clear meteogram can also be displayed with a mouse click.
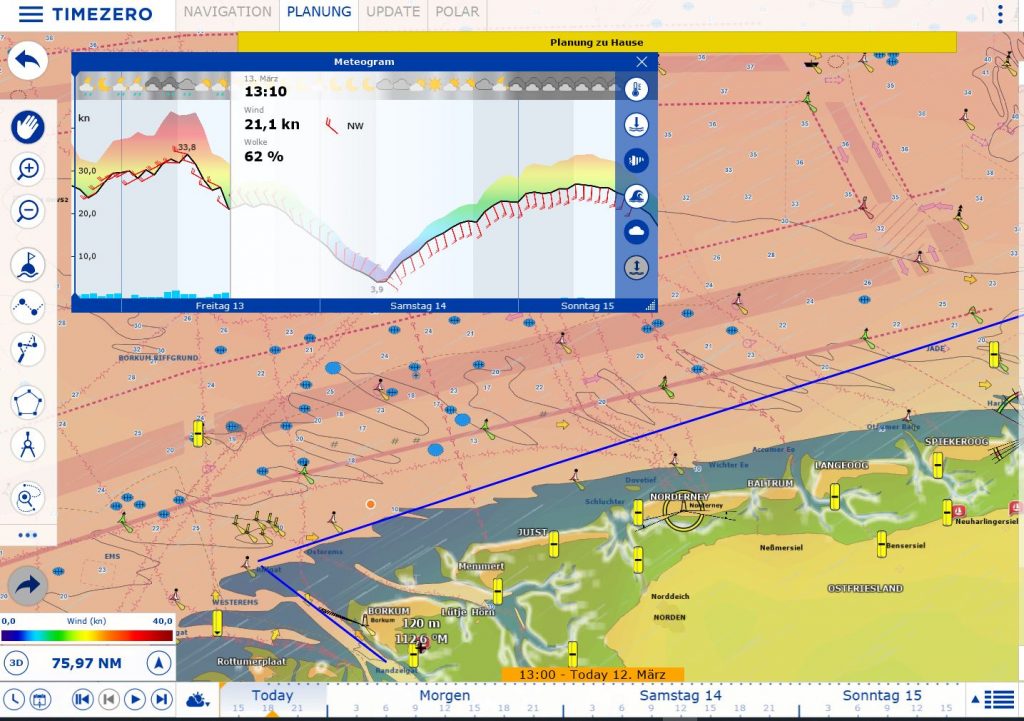
There is a timeline at the bottom of the screen and you can then let the weather simulation run automatically over time or scroll through it on an hourly basis to view the predicted weather conditions at the time.
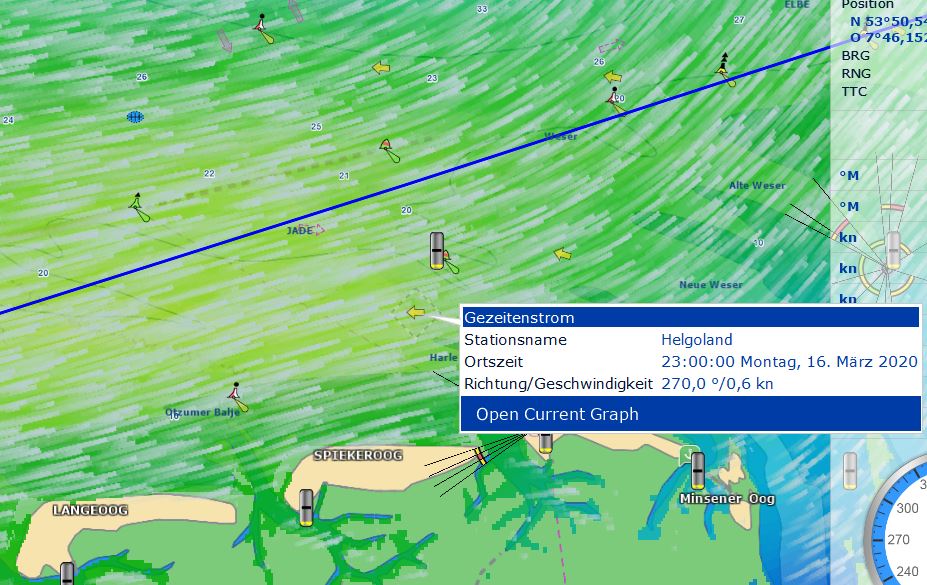
Tidal currents are stored and can be visualized, as well as weather-related current data included in the downloaded grib data.
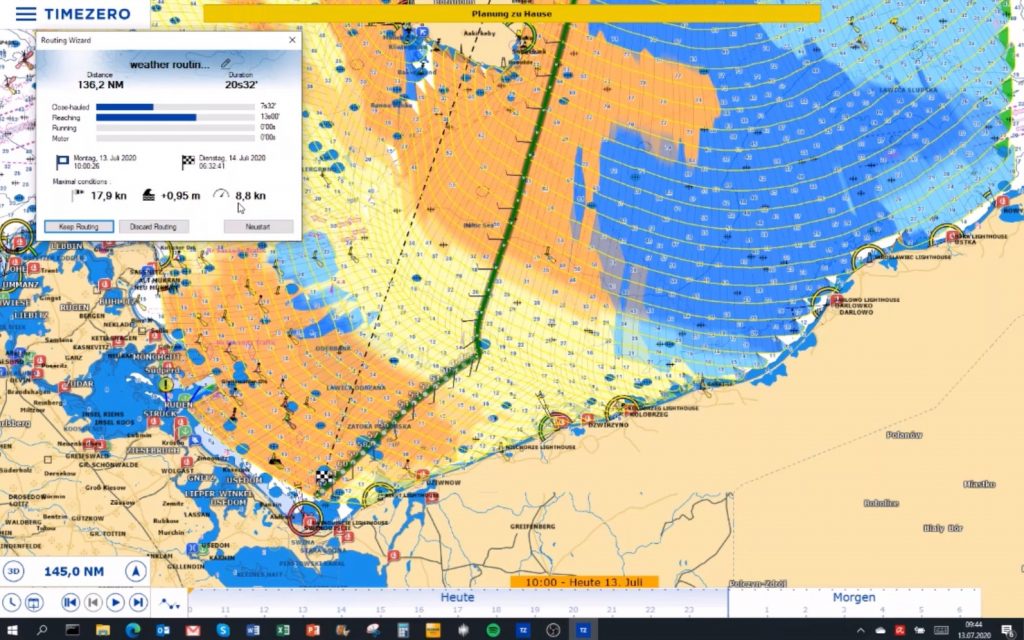
The purpose of weather routing is to determine the optimal route related to the predicted weather conditions in the planned time frame on the route between the start and destination, taking into account the known capabilities of the vessel.
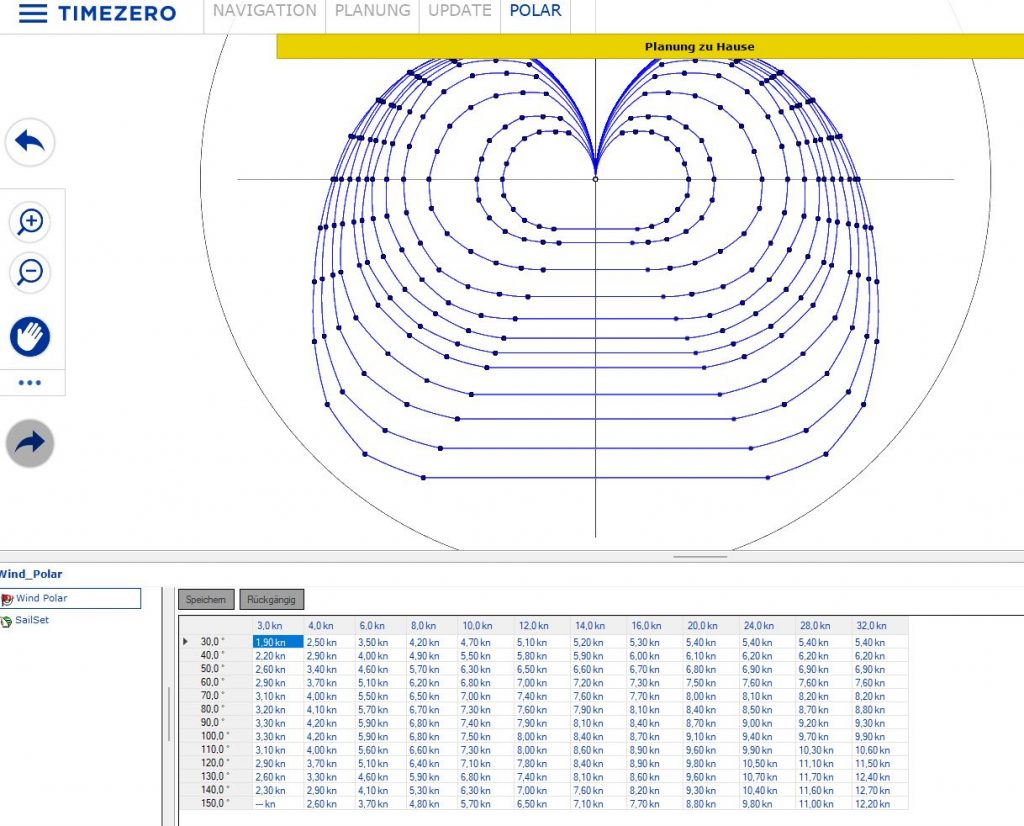
The weather routing is based on an individually stored polar diagram, which shows the theoretically and ideally achievable values for speed through the water (STW) depending on the wind angle and speed, as well as the optimal sail position. A very large number of polar diagrams for the most common boat models are available here in the system “out of the box” and can also be adapted to the own ship if required.
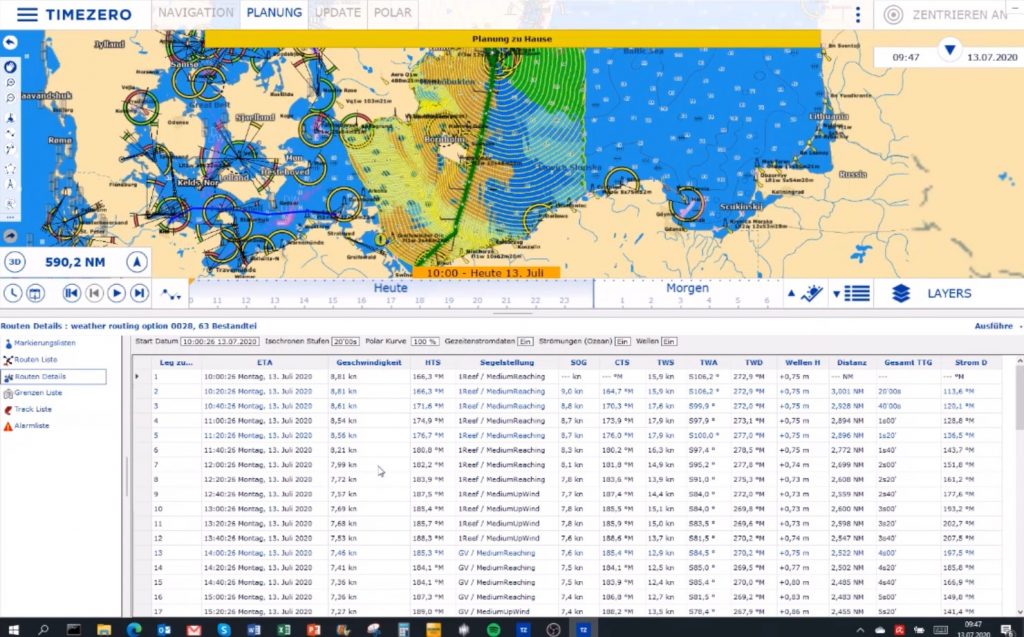
Weather routing can be started either in relation to an already planned route or by marking a start and destination point. The algorithm then determines the fastest route to the specified destination based on the specified start time, the available Grib data and the polar diagram. The algorithm also takes into account defined conditions such as minimum depth, maximum wave height and wind strength. As a result, a calculated optimal route with DTT and ETA is suggested on the chart, with wind direction and strength as well as sail position being shown for the individual sections.
The sections can also be displayed as a detailed list, from which various other values (e.g. AWA, AWS, TWA, TWS, SOG, current, wave height and direction, etc.) can be seen.
It is really fun to have the weather forecast displayed in this form and especially to have theoretically ideal routes calculated. The functions are largely self-explanatory and easy to use. However, one should not blindly rely on the seductive power of the seemingly accurate weather routing. Of course, the system takes into account even the smallest predicted wind shifts and then suggests corresponding courses in the route. In practice, however, even daily grib data deviates significantly in time and space from the actual wind direction, so that in the end you usually have to adjust the course to the concrete conditions you find. Unfortunately, the tidal currents are only taken into account during routing if you have also purchased the layer for the high-resolution tidal current display for the corresponding area. Nevertheless, this type of planning is helpful because it can provide valuable suggestions for course optimization over the entire course. It is not always easy to keep an eye on the relevant predicted wind changes and current conditions for the planning when looking at the weather forecast over time and the entire course. The software can do that well and at least better than I can. 😉 .
It would be desirable to have a vector-based representation of the current conditions resulting from weather and tides, as is possible, for example, on the Norwegian weather site www.yr.no.
Here are 2 more video examples of weather routing (in German):
Coupling with Furuno Radar DRS4D-NXT
In winter 19/20 I installed a Furuno DRS4D-NXT radar (not to be confused with the DRS4W, which was tested in Yacht 2/2020). In addition to the safety gain that a radar brings in poor visibility and at night, my main concern is to get an early warning signal when approaching ships or objects when sailing single-handed – and temporarily without a lookout – in order to be able to react in time.
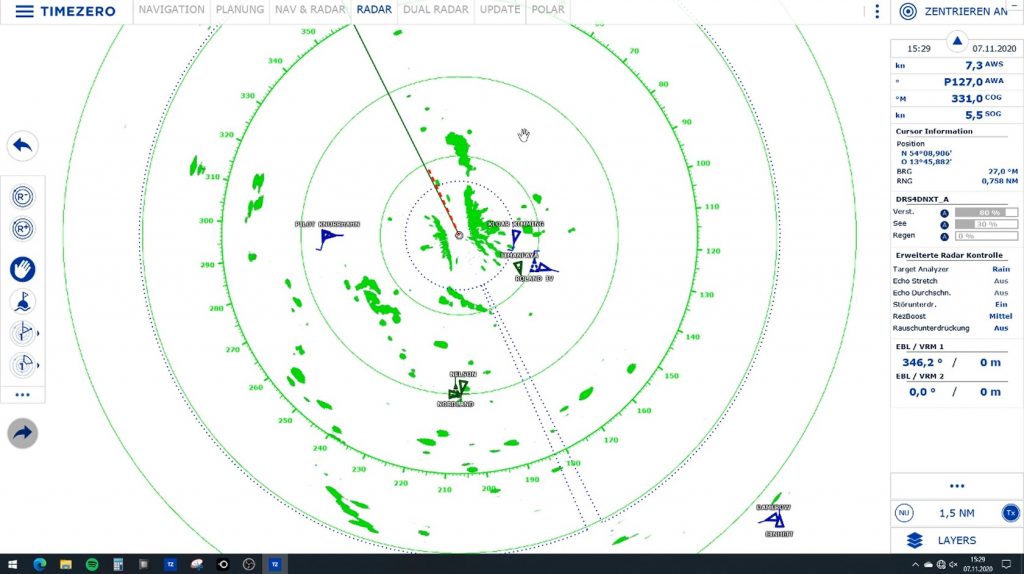
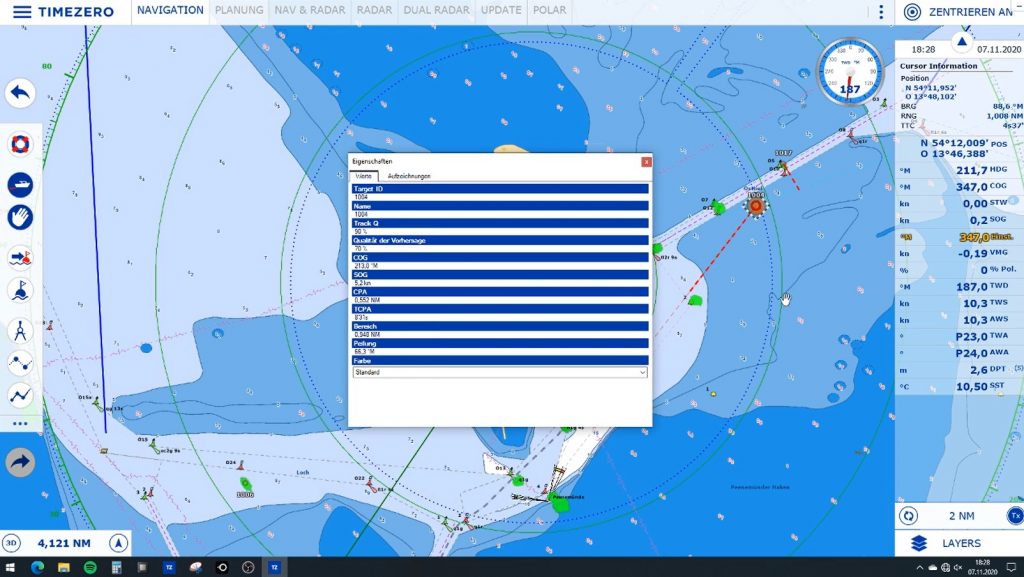
In addition to these safety aspects, the Furuno DRS4D-NXT convinces me with its very low power consumption compared to conventional yacht radars, much lower radar beam emissions, higher target resolution and virtually no warm-up time after start-up. These advantages result because the unit uses a “solid state” antenna rather than a conventional magnetron and employs a proprietary X-band pulse compression technique. With the help of the target analyzer function based on Doppler effect technology, for example, automatic detection and color differentiation of approaching targets is possible. Within a radius of up to 12 nm, radar targets that are approaching are highlighted in red in Target Analyser mode, while the others are displayed in green. Automatic target acquisition and tracking (ARPA) including graphical vector display and display of CPA and TCPA is also provided.
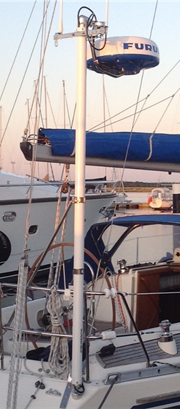
Last but not least, I found the compatibility and interaction with the Timezero Navigator software, which I have in use, and the simple connection of the radar antenna to the on-board PC interesting. The data connection to the PC is via Ethernet. I mounted the 24″ radome antenna on a Scanstrut radar mast with semi-gimbal, which was very easy and quick because all parts are matched and fit together well. The laying of the 15 m connection cable from the radome to the PC and on-board power supply was somewhat more difficult due to the somewhat limited possibilities on board.
The cable is pre-assembled and includes both Ethernet connection and power supply in a common sheath. So you have to order it right away in the length you need. A semi-gimbal was important to me, so that the radar does not become “blind” when sailing with position in the lateral sectors. The vertical beam angle of the antenna is 25 degrees, but this is not sufficient to detect radar targets in the range of 90 degrees abeam if heeling is more than 12.5 degrees. And a heeling of 20 degrees over a longer period of time is not uncommon when sailing.
The technical connection to the PC via Ethernet cable is also very simple. Power is supplied from the 12 V on-board power supply. For the use in the Timezero Navigator, only a fixed IP address for the LAN adapter of the PC must be assigned and after the start of the Timezero Navigator, the interface check or recognition must be run through once. After that, the radar functions are fully available in the Timezero Navigator electronic chart. After switching on the power supply, the radar unit is on standby and is started with a click on the corresponding button in the navigator and then also immediately begins to transmit and record the result on the screen.
In addition to the “overlay” display, in which the radar image is projected on the nautical chart,
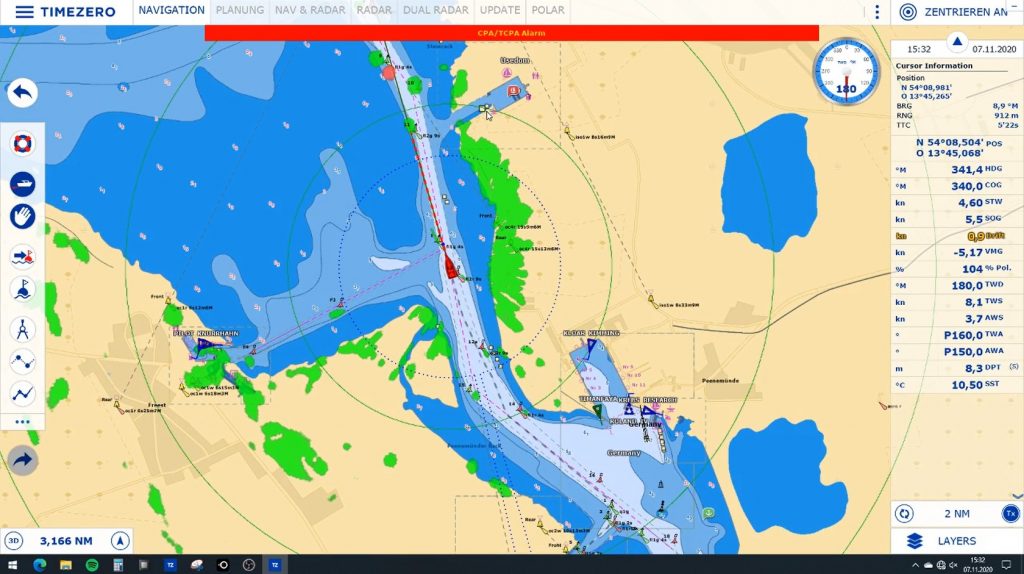
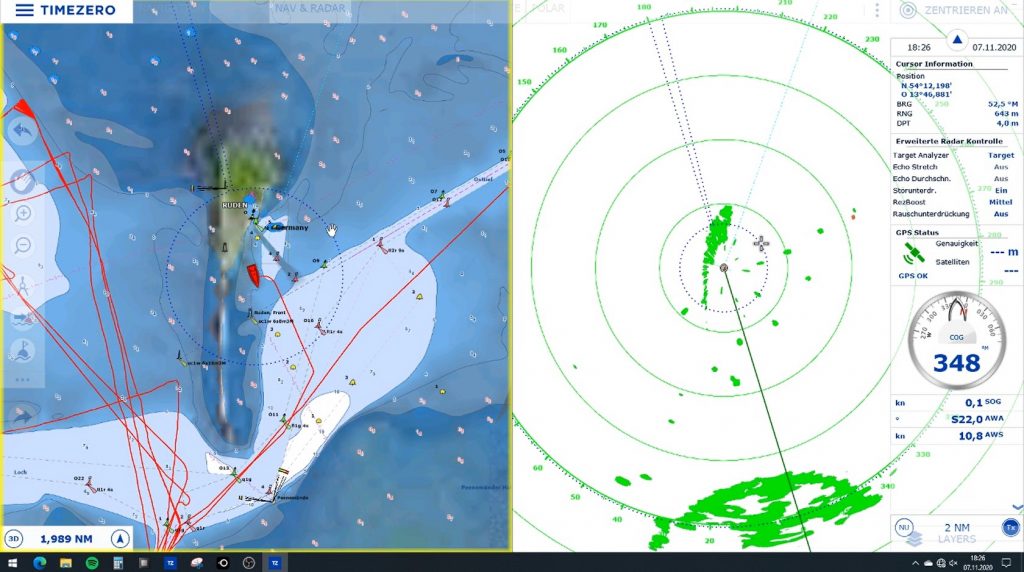
there is also a parallel mode, in which the radar image and the chart are displayed synchronously in 2 windows opened side by side, where the movements of the mouse are synchronous in both windows and AIS targets are displayed simultaneously in both windows. If you place the mouse pointer on a target in the radar image, it will be in the same position in the chart window and if there is a navigation mark or AIS target or other object there, you will have clarity immediately. This can be helpful for the interpretation of the radar image, especially if in the “overlay” mode a lot of radar echoes are displayed and important objects in the digital chart are overlaid by radar reflections and thus information is obscured.
The Target Analyser function automatically detects approaching radar targets and highlights them in color compared to non-critical radar targets. I also find the ARPA function very helpful. In “Auto Acquire” mode, the Furuno DRS4D-NXT Doppler Effect based automatically detects and tracks ARPA targets. This displays and tracks targets with their own vector, CPA and TCPA that are approaching their own vessel location at a speed greater than 2 knots (adjustable). For targets within a freely adjustable Guard Zone, an alarm can also be activated, which is automatically triggered when the speed falls below a CPA to be defined. This alarm function is very helpful when sailing single-handed and for me personally the most important reason why I purchased the Furuno DRS4D-NXT.
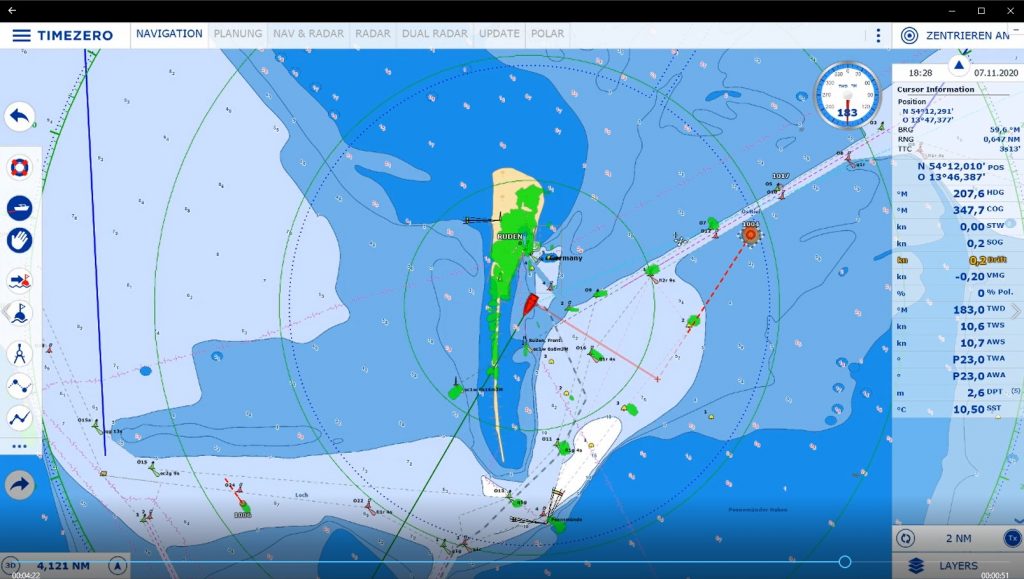
Large objects such as commercial vessels are reliably detected and tracked as ARPA targets at a distance of 6 – 12 nautical miles, depending on the antenna height, while smaller yachts with aluminum masts or boats with radar reflectors are detected and tracked at a distance of 1.5 – 2 nautical miles.
However, it is of course also possible at any time to display all available data about the radar target (such as COG and SOG) using the right mouse button via the context menu.
The radar options and settings briefly presented below are diverse and, in principle, sensibly preset for the time being.
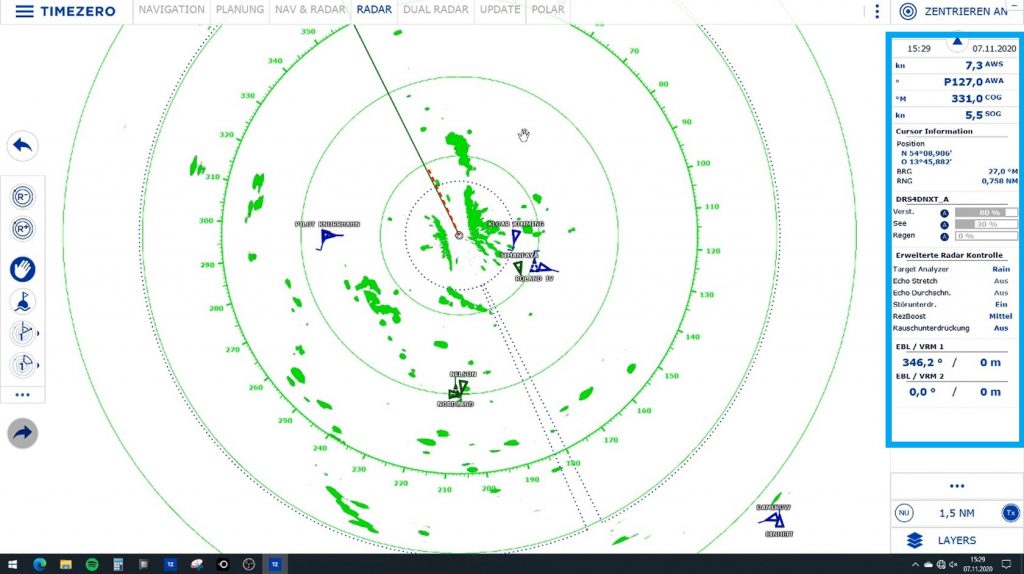
Important settings are – of course depending on the used device, in my case the Furuno DRS4D-NXT – also automatically adapted to the respective situation, e.g. Gain / Sea (STC) / Rain (FTC), with good results in my opinion. In “Rain” mode, the rain echoes can be displayed in a different color than the radar targets that may be hidden in them. This setting can be adjusted so that regular radar targets appear clearly distinguishable within the rain echo. Display and manual setting of these functions and parameters is done via the Radar Control Panel of the Timezero Navigator (outlined in red on the right side in the picture above). However, a manual setting probably only makes sense
- in extreme weather situations (heavy rain, swell) or
- if other parameters are changed manually, which in turn have an interaction with Rain & Sea Clutter, such as “echo stretch”.
However, this also requires the user to have the appropriate expertise.
The optimum radar pulse length is already preset for the available ranges, but can be changed via the “Pulse Length” function for the set range in order, for example, to display more distant targets better (increase pulse length) or to delimit close targets more clearly from one another (reduce pulse length).
With the “Echo Trail” function, the radar targets leave a trail on the screen. However, the function only makes sense in “True” mode, because in “Relative” mode all targets leave a trail that move relative to the ship, i.e. also land and permanently installed navigation marks. The function requires a connected “Heading Sensor”, which supplies the system with the course data.
When the Furuno DRS4D-NXT is connected, the Target Analyzer function is available. If this is switched on, radar targets approaching the own vessel are displayed in red, while all other targets are displayed in green. The function works independently of the speed of the targets. The color changes dynamically when the approach position changes.
Also working only with the Furuno DRS4D-NXT is the “RezBoost” function, which enables an improvement of the horizontal radar beam resolution up to a factor of 2. A side effect can be that radar targets appear smaller after switching on this function.
The “echo stretch” function stretches radar echoes and makes small targets more visible. However, this effect also extends to sea and rain clutter, so the suppression for these should be set accordingly high.
The “echo averaging” function displays an average of several image sequences, which effectively suppresses disturbing image effects. The disadvantage is that moving targets are displayed weaker.
The colors of the radar echo are selectable between red, green or yellow, also the transparency of the echo display in the overlay mode can be adjusted. In addition, there are the functions “noise rejection”, “interference rejection” and “bird mode”, which I will not describe in detail here.
My following conclusion is very subjective insofar as I have only known older radar models that provided a monochrome image with a separate screen and usually also a poor resolution. The interpretation of the image alone is a potential overload for the beginner with such devices. A single target approaching with unchanged bearing may be relatively easy to recognize and interpret. But even the radar-based approach to a harbor entrance in fog – i.e. based on the radar echoes – can only be mastered with great experience and expertise.
Based on this, my enthusiasm about these new possibilities of the Furuno DRS4D-NXT is great. Finally, radar is easy to master even for the normal recreational skipper and, on top of that, it is extremely powerful. Apart from the mechanical installation, for which one must of course have a certain hand, the connection and handling is really simple and safe and in interaction with the Timezero Navigator also largely self-explanatory. The online manual explains the features and functions very clearly and in detail.
In general, a radar does not really provide any additional value for a day trip and good visibility. Except perhaps a certain sense of security, as you know that you are prepared for the case of a fast and surprising rising sea fog. However, the radar clearly provides added value in fog and poor visibility and, of course, at night, when dangers are not visible to the naked eye. Anyone who has ever been surprised in “pot-thick” fog at sea without radar knows what I mean. When the radar is self-explanatory, easy to use and seamlessly integrated into the electronic chart, then it starts to be fun. And then as the icing on the cake: the possibility on longer trips over open water, to be warned by the system when approaching dangers.
After a due to Corona unfortunately somewhat shortened season with trips from Vorpommern in early summer to Smögen and in the fall to Kiel and back again, I am also convinced of the operational and functional reliability of the device and the software. I have not had a single failure or functional error. Plus points are the very low power consumption compared to conventional yacht radars, the much lower radar emissions, a higher target resolution and the instant availability of the radar image after the start of the device, so as well as virtually no warm-up time. These advantages result from the use of a proprietary X-band pulse compression and solid state technique. The Doppler effect technology based target analyzer function with automatic detection and color discrimination of approaching targets is quite a nice touch. The automatic target acquisition and tracking (ARPA) including graphical vector display and display of CPA and TCPA is likewise.
Manual and support in English. Response time for support requests for handling in the hour range, so far always under 24 hours.
Danke für den Praxisbericht. Als Entscheidungshilfe pro Radar sehr gut.